How to Install a WordPress Menu Plugin – Step-by-Step Guide
-
Manish Sharma
-
02 Jan 2021
It’s a well-known fact that several third-party plugins support WordPress. These plugins make your WordPress website more functional and include things like adding a contact form, a header, a footer, a shopping cart, or any such extended features. But how do you install a WordPress Menu Plugin in the first place? Let’s take a look at three different ways to install the plugin to better understand the process.
Prepare to initiate the WP Menu plugin installation
Preparing for the installation thankfully doesn’t include rocket science, all it is is making the upgrade to the business plan of WordPress.com. When you’re using WordPress.com as a beginner, you will not find plugins in your dashboard. It’s a common question among new users who wonder why they can’t find the plugins.
If you’re not interested in moving to WordPress.com’s business plan, the alternative is to go for a self-hosted site at WordPress.org. Many budding business owners don’t know much about this option. If you want to do this, you need to migrate the website from WordPress.com to WordPress.org.
Here is a quick overview of moving a WordPress site from WordPress.com to WordPress.org:
- Export data from WordPress.com: Go to WP Admin on the left side of the screen.
- Visit Tools>>Export. Click ‘Start Export’
- Since you’ll need to transfer all the data, select ‘All Content’
- Set up WordPress
- Import Content to your self-hosted WordPress site
- Import Blogroll Links
- Set WordPress.com blog to private
- Redirect visitors and preserve SEO
Coming back to the WordPress Menu Plugin installation process, here are the three main methods to a quick installation:
- Install a WordPress plugin by using the search option
- Upload the WordPress plugin
- Install WP plugin manually using FTP
1. Install the plugin using the WordPress plugin search option
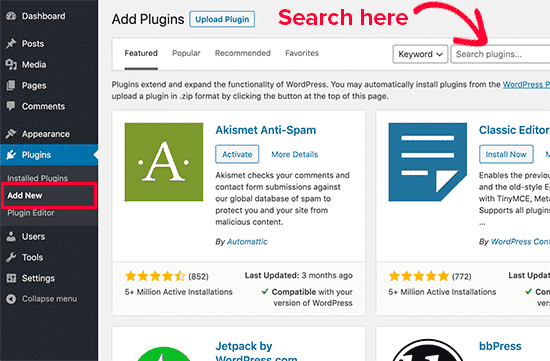
- If you are a business account holder of WordPress.com, you will find a search bar for plugins at the dashboard’s top right corner. Searching the plugin here and installing the one required for your purpose is the easiest way to complete the installation process.
- Once you have found the desired plugin, follow these steps:
- Plugins> Add New.
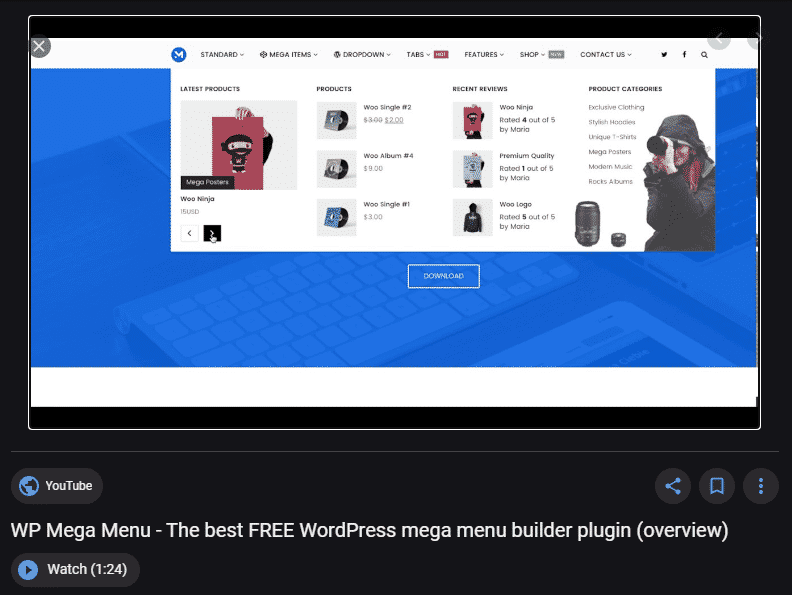
- Let’s take the Menu plugin as an example to understand the procedure. Once you search ‘Menu Plugin,’ a list of available plugins will appear on the screen.
- Click the ‘Install Now’ button.
- Once the installation is complete, you are prompted to click ‘Activate.’
- Clicking ‘Activate’ completes the installation process. If you forget to do it, the plugin will not be visible even when installed. So, make it a point to activate!
After the activation is complete, you will have to follow the steps for ‘configure the plugin settings.’
2. Installation of a plugin using option WordPress Admin Plugin Upload
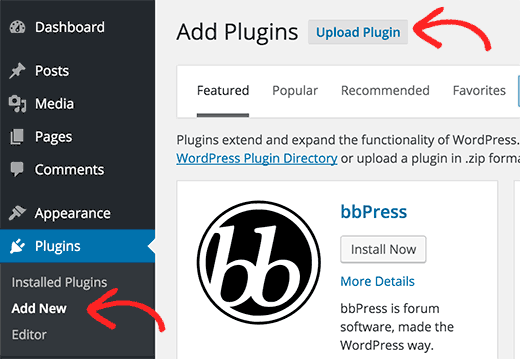
The upload method is needed for those plugins which are not available for free or are paid. The process of installing a paid menu plugin for WordPress includes the following steps:
- Download plugin from the source, which is nothing but a zip file.
Go to the WordPress admin area; click ‘Add New’ under Plugins.
Click ‘Upload Plugin.’ This will take you to the plugin upload form.
You will find the ‘Choose file’ button in the prompt window. Select the required file. - Click ‘Install Now.’
WordPress will upload the file chosen from the computer and install it.
You’ll see the progress of the installation through a window that reads – Unpacking the package, installing the plugin, and finally, plugin installed successfully.
Like the direct search plugin option, you will need to click ‘activate plugin’ to make it functional. - Follow the steps to configure the settings to complete the process.
Now, let’s find out the third way of installing the WP Menu Plugin, by using FTP.
3. Installing WP Menu plugin using FTP

Sometimes, a user won’t be able to install or update the plugin by writing to the /wp-admin directly. Changes to WordPress’s file system, such as when upgrading, installing, or updating a Menu plugin requires permission. When the permission is not available, the user is prompted to provide FTP user account information.
When asked for FTP information during the installation of a WP Menu Plugin, follow these steps:
- Download the plugin source file, which is usually a zip file
- Extract the zip file on the computer.
- You will find the extracted file with the name the same as the plugin file.
- To install the plugin, this file is to be manually uploaded using FTP details.
- FTP details comprise the username and password available with your FTP manager.
- In case you do not have these details, you can request WordPress to provide you with the FTP login details.
How To Upload Login Using The FTP Details:
- Open FTP client on the computer
- Connect it to the website using the FTP login details provided by the web host
- Go to /wp-content/plugins/folder on your WordPress site
- Upload the extracted zip file using path: /wp-content/plugins/folder on the webserver
- Visit the WP admin area
- Click on the ‘Plugins’ link in the admin menu
- You will find the plugin you have downloaded in the list
- Click the ‘Activate’ link below the plugin name appearing on the list
- Configure settings
- Common questions related to installing WP menu plugins
Now that you know how to install the WP Menu Plugin, you may have some questions, like the ones below:
- How Do I Select The Best Plugin For Installation On A WordPress Site?
With more than 50,000 plugins available, it’s easy to get confused about which one to choose. One trick is to look at the update status. Look for a plugin that is updated and that has all security features up-to-date. You can also look for free options, which can be quite helpful in the beginning stages of building your website.
- How Do Installed And Active Plugins Differ From Each Other?
In this guide we’ve stressed the importance of activating the plugin after you install it. To know whether or not you have activated the installed plugin, you can visit the Plugins page. Activated plugins will have a highlighted blue background, whereas a white background means the plugin is installed, but not activated.
- Do I Need To Delete The Inactive Plugins?
If you don’t plan to use a plugin, the smart thing to do is to delete or uninstall the inactive plugin. Even though it isn’t active, the plugin is still an executable file, which means the cyber miscreants can attack these inactive plugins to install malware on your site or even try hacking into the site through them. Because of this you should only keep active plugins and check your plugins page regularly in case you missed any activity.
- Can I Have Unlimited Plugins For My WordPress Website?
WordPress plugins can be installed in unlimited numbers. You can have as many of them as your heart desires. Still, do you need them? Installing needless plugins can slow down your website considerably. It is better to have a few quality plugins rather than a high number of them.
- Can I Uninstall A WP Menu Plugin Anytime?
Yes! The WP Menu Plugin shows up just like any other plugin on the plugin page. You will find the ‘delete’ option just below the plugin name. Even if the plugin is active, you can use the same button and delete the plugin, whether you just want another plugin, or simply aren’t happy with the quality of the plugin.
- WordPress Already Has A Menu, Why Do I Need Extra Plugins?
The WordPress Menu Plugins that come pre-installed have some limitations. To overcome those, you may choose to install WP menu plugins. Reasons to install extra plugins can be:
- To make more extensive mega menus
- To get media to support not be available in the pre-built menus
- To make the menu more responsive so that it looks good on all devices
- To get the technical support that comes along with specific WP menu plugins
- To get drag-and-drop convenience to make a menu even better.
So, now you know everything about installing WordPress Menu Plugins. Next time you feel something is lacking in your WordPress Menu, you can use this plugin installation guide to set up a menu that covers all your needs and wants!
IMPORTANT: This written material has been prepared based on the sources which you provided. Neither Flocksy nor the creative who wrote the copy makes any claims whatsoever as to the accuracy of the information contained within, and they are not responsible for any legal or financial difficulty resulting from the use of this written material. We encourage you to review it thoroughly before disseminating it or using it in trade.
One Reply to “How to Install a WordPress Menu Plugin – Step-by-Step Guide”
Leave a Reply
Recommended WordPress Hosting
Featured WordPress Plugin

Latest blog articles
- Best WordPress Theme for SEO Are you having trouble finding an appropriate theme for your website?
- How To Start A Fitness Blog; Steps And Recommendations Are you having trouble finding an appropriate theme for your website?
- Best Website Builder for Authors you should consider in 2021 Are you having trouble finding an appropriate theme for your website?
- Easy and Effective ways to create a Landing page in WordPress Are you having trouble finding an appropriate theme for your website?
- How to Add an Accordion in WordPress Are you having trouble finding an appropriate theme for your website?
- Top 5 PayPal Plugin For WordPress; Reviews, Pricing, And Comparison Are you having trouble finding an appropriate theme for your website?
Im not that much of a online reader to be honest but your blogs really nice, keep it up! I’ll go ahead and bookmark your site to come back later. Cheers